
Portside
Head Administrator
-
Joined
-
Last visited
Everything posted by Portside
-
 Dev Blog #2 ~General Updates~ We aim to strive to keep the community running as smooth as possible. Whilst this past week has been busy, we'd like to show you some of the things that have either been fixed, added or removed during its time. Key: Removed: - Added: + Reworked/Fixed: // // Optimized new mods system so that stuff loads faster, modded cars are more responsive onClient. // Players no longer stand when after they have been downed. // CKed bodies will now retain their custom skin and won't reset to CJ // Entering interiors won't have that annoying unload>load custom mod (turn to CJ then back to player skin) anymore // Tried optimizing a fetchImage glitch where images for custom peds would become vehicles and vice versa // Optimized processes for NPCs, shops, fuelpeds and peds for having custom skins (should stream accurately whilst not depleting client resources) + Added a line of text when a player accepts /carry notifying them that they can drop the person by /drop // Fixed annoying debuglog that was conflicting with an old script causing CPU loss + Encrypted custom AGRP Objects (3d models such as Montgomery Park, Blueberry etc) // Fixed UCP redirect error for when a player tries to upload an avatar (hopefully that's fixed now, still requires further testing) ty for reporting 5150 - Removed any traces of Bayside project // Reworked Newbie bonuses, faction bonuses and state benefits for a lower, more stable economy // Adjusted admin commands to have quicker aliases e.g: /gotomark /gtm // /commands /cmds etc // Fixed New Characters not being able to change skin in the preview // Fixed annoying output bug which could be detrimental in the future regarding clients trying to request handling from custom vehicles + Re-enabled the RP Zone + Improved Discord logging functionality for a wider variety of scripts // Fixed a bug regarding /makeveh (Smokerhands Assist) + Added a disclaimer when a player dies that there is a 60 second countdown timer. - Cleaned up mapmods script to remove non-existent mods + Added missing images to Custom Objects on UCP + Added Watermark to all interior images on UCP (Sonny) // Fixed a bug where object previews weren't working in shops // Fixed incorrect formatting on interior names on UCP // Reworked new mods system for optimization (experimental and may cause errors, hopefully not) // Reworked Discord Logs for account system // Fixed an issue where players could not retake the practical bike test after a disconnect from the server // Fixed an issue where when license is suspended it would not show correctly in the DMV // Fixed an issue when a player has already bought bike test and after disconnect retakes their test but gets charged again. (this is now free, onetime payment) Further updates to come and and constant improvements are being made to the server. Thank you for continuing to play the server and supporting us. We hope that we are providing you with the quality that we are aiming for. Kind~Regards, Portside
 -
ArdicGaming Roleplay New Mods Unique IDs RULES: https://wiki.ardicgaming.com/en/moducp We can now have an infinite amount of NEW SKINS on the server which can be uploaded and submitted by anyone via an easy to use in-game menu! - Custom 3D models and textures supported (dff + txd). - Everyone can see your sexy modded skin. - Mods can't be stolen by other players. It's all stored in the server. - It's not resource intensive (has no negative impact on game performance; they load just like any other ped model). - It's way more efficient that using custom skin textures (the system we've had for a long time now). - New skins can still be used for applying custom image textures to them via the custom skin texture system we already have. - You can upload a small preview image of your mod which will display for everyone including in the inventory. - You can upload a skin for yourself (private - only you can obtain), for a faction (only faction members can obtain) or for public use (distributed globally on clothes shop NPCs!) - Mod review team can preview any mod submitted and easily check if it has any issues such as incorrect bone positions or abusive collisions. In short: adds a whole new look & feel to the game, possibilities are endless... There are literally millions of amazing low poly GTA:SA Skin mods out there. We're happy to make this big step into game customization. We hope you have a great time being creative! TUTORIAL How to Upload a mod Please read the rules before using the new system: https://wiki.ardicgaming.com/en/moducp Coming soon Kind regards, AGRP Management
-
AGRP Business System v1.5 The features described in this guide are subject to change. Introduction Business management has never been this extensive on MTA roleplay servers, thus AGRP takes pride in features that contribute to the overall atmosphere of the server. With that being said, a brand new script has been developed by Nando to make business management achievable and enjoyable for everyone involved. Tutorial 1. Acquiring a business property First and foremost, you will need to decide whether you will be running an independent business or if it will be owned by a legal company. If you choose the latter, know that you can purchase a faction slot at the County Hall. The process is as simple as walking up to the property and purchasing it for yourself, or your faction. 2.Deciding the type of your shop If you're not satisfied with the shop type of the business property that you obtained, you can always create a report to have an admin change it, Here is a full list of the existing categories of shops on AGRP: - General Store or 24/7 (Goods, Electronics & Consumables) - Electronics Store - Food & Drinks (Restaurant/Cafe) - Liquor Store (Beverages only) - Furniture Store - Clothing Store - Firearms Store - Hardware Store (Tools & Appliances) - Gas Station (24/7 + refill orders) - Mechanic Garage (vehicle customization orders) Every shop can have up to two different NPCs! If you have one of the NPC types above you can have an extra special NPC for your needs: - Custom Store (Empty NPC that you can restock with your own items) 3. Management panel Welcome to your management tab, which you can view by right-clicking on your recently spawned NPC. Here, you will see every important aspect of your business, including your employees, your current stocks, prices and other useful features. Let's explore those, shall we? Managing your shop Your shop will not function on its own unless you restock it regularly, choose competitive prices and hire employees to boost your sales! Management can be done mainly via the dedicated tab on the NPC of your shop. 4. Manage Supplies Via this button you will have the opportunity to order supplies for your business which will be delivered straight to its doorstepby the county's brave truck drivers. Prices are dynamic and tend to vary a lot every week. 5. Manage Products Here, you will be presented with a list of your products your store is currently selling. You are able to oversee their prices and you will have the ability to change those too by simply double-clicking on your product. Fun fact; if you have a Custom NPC in your store, you can drag and drop items onto it to put them up for sale for prices of your choice! 6. Manage Employees Now, time for your staff! Via this button you are presented with all the possible actions that allow you to manage your personnel. The commands are pretty self-explanatory. Here is a list of existing ranks and their permissions. - Employee: the starting rank Can only use the special commands of the shop and resign whenever they wish. - Manager: the only level you can promote an employee to Can hire anyone, fire other employees, and can resign whenever they wish. Has permission to manage Stock & Products. - Owner: the person or faction who owns the shop Can hire, fire, promote and demote anyone. Cannot leave the business -> only way is to /sell it to someone else; or have it transferred to another company. Has permission to manage Stock & Products. 7. Collect Profit Everyone's favourite: money. It's as simple as clicking on the presented button to fill your pockets with the money stored in the cash register. 8. Clear Logs Logs are pretty useful. You will be able to see everything relevant to your shop, including items that were ordered to be restocked, recent purchases, rewards and employee logs. The button will clear all of the logs so it's recommended that you have them saved for yourself before you erase it. Additional Information 1) You will not be able to purchase anything from an NPC shop when a player-owned shop is currently stocked and open. 2) Truckers will not be able to stock NPC shops when player-owned shops are currently pending orders. 3) A business owner can hide/show NPCs of the shop with a simple /tognpcs 4) Mechanic garages and gas stations have access to the special /o(ffer)s(services) command! 5) Shops which sell Meals & Beverages can create generic food & drink items (any name & object!) for a discounted price.
-
Vehicle Dealerships The features described in this guide are subject to change. NPC Dealerships Anyone may purchase vehicles from NPC-owned dealerships that can be found across the map. These dealerships are identified by yellow blips on the map: A NPC dealership has a ped that you can interact with. You can preview and test-drive all vehicles available for purchase. Since a recent update, NPC Dealerships will be closed for certain periods of time when the server admins deem that there are enough player-owned dealerships with vehicles for sale to the general public. You can read about these below. You will know when a NPC Dealership is closed when trying to interact with it, and will be informed of where to find player-owned alternatives. Player Dealerships Anyone is free start to start a legal business with the sole purpose of trading and selling vehicles. As of posting this guide, anyone can place their vehicle for sale by following the instructions in this guide. This ability of using the new vehicle for-sale script may later be restricted to only established vehicle dealership companies. As mention in the first point of this guide, admins will disable an NPC Dealership if there are enough vehicles being sold by players of the same category, and are well advertised so that players can easily find them. This will give Player Dealerships a higher chance of selling less attractive vehicles that people normally obtain from NPC Dealerships because they are more easily accessible, and require 0 roleplay to purchase.
-
Video credits originally from San Andreas Roleplay - The predecessor of ArdicGaming Roleplay I'm a Taxi Driver! Time to grab yourself a car from Harris Autos and slap a taxi sign on your fresh automobile and setup your taxi meter! Many vehicles can be used as a taxi as long as they have two things; Taxi sign (yellow or black, your choice) and a taxi meter. From there you can use your mouse to interact with the taxi meter to turn on its light, set your fare price and so on! /tduty /taxiduty or click the icon up on the HUD in the top right to go on your taxi duty to begin serving customers of Red County! Players can call 444 to place a request to get a lift from you. Or you can occasionally get NPC calls to keep you active!
-
AGRP Trucker Job v1.1 The features described in this guide are subject to change. Video credits originally from San Andreas Roleplay - The predecessor of ArdicGaming Roleplay Explanation For a long time on MTA roleplay servers, there has never been a proper trucker job. Although what we present you here is not a final product nor the perfect trucker job, we believe it's already way more developed and fun than the delivery driver job we saw on other MTA RP servers. The objective of this job is to buy & sell supplies that are available in the market for prices that may vary. Our original trucker job was planned for the whole of Los Santos and its surroundings but, for the time being, we've simplified it and contained everything inside Red County and possibly Angel Pine as well. There are so called industries that sell supplies which they make by requiring other supplies to be sold to them by truckers. The supplies intended for consumption by businesses are all that you can currently buy on this version of our trucker job. The goal is to profit from buying and selling for a higher price (this is automatic). There are two types of businesses that can order supplies for you to deliver. There are player-owned businesses who place orders manually, but there are also NPC-owned businesses that generate supply orders throughout the day. Below you'll find a list of what they buy. You must deliver these supplies using a truck or van (see the list of allowed vehicles below). On a future version of the job we will allow the use of eighteen wheelers with different types of trailers, for different types of cargo. Currently, the only truck and van models that are supported by this system are the following (with the respective capacities): Pickups: Bobcat - 6 crate slots Sadler - 6 crate slots Yosemite - 6 crate slots Walton - 6 crate slots Utility (modded)- 6 crate slots Moonbeam - 6 crate slots Vans: Pony - 8 crate slots Topfun - 8 crate slots Burrito - 8 crate slots Rumpo - 8 crate slots Trucks: Benson - As many as you can fit in the interior Boxville - As many as you can fit in the interior Mule - As many as you can fit in the interior Yankee - As many as you can fit in the interior Tutorial Becoming a trucker You can obtain the "trucker job" required to buy & sell supplies via the SupplyHub application on your cellphone (blue) in-game. This will remove you from any other job: taxi driver, bus driver, etc. 2. Picking a supply order You can browse all the pending supply orders in that application. You're able to view the details of the order and click Accept to start the GPS navigation to the location where you will have to deliver the supplies. 3. Getting the supplies But wait, you need to buy the merchandise beforehand. You can do so by locating an industry or distribution hub that sells the product that you want to resell to a business. The storage units are scattered around the warehouse. Here I accepted a route which requires x225 "General Goods". You do not have to buy all, you can transport as many as you'd like. Once you park your compatible vehicle into the blip, you have to right click onto yourself and specify how many units you'd like to purchase. Once that is done, you'll have to manually pick up the "Crate" item and place it into your inventory. Off-loading the units work vice versa; you simply remove it from your own inventory and place it into your vehicle's. Make sure your doors are open! 4. Delivering and offloading Delivering is just as easy as it sounds, though needless to say, try not to get caught speeding, ramming into others, the usual. Once you have arrived at the drop-off location, safely park up and repeat the previous steps - open your rear doors, take your crates out via the inventory system and drop it onto the ground within the blip. With a simple /selldropoff, your dropped off items are sold and the money is wired over to your bank. Voila, you have done it! You just delivered!
-
Selling Vehicles The features described in this guide are subject to change. Selling to another player or faction You may sell a vehicle that is registered to your character's name to any other player. Faction leaders may do this with a faction-owned vehicle. To do so you have to follow these steps: You (or the buyer) need to obtain a DMV Ownership Transaction Paper item from the Department of Motor Vehicles (Montgomery DMV office). You then have enter the vehicle you wish to sell and ask the buyer to stay next to you. Next, you click the DMV paper item in your inventory, and fill in the buyer's character name (no underscores). Once you press Sell the ownership of your vehicle will be transferred to the buyer which will automatically receive the vehicle key. Note: You can transfer ownership of a vehicle from a faction you lead to yourself using the DMV paper. You can also sell a vehicle to a faction by entering the full faction name in the DMV paper sell menu. Putting your vehicle for sale This feature is only for DEALERSHIP FACTIONS. You may alternatively display a 'for-sale' sign on your vehicle which allows anyone to purchase it without requiring your presence. Faction leaders may do this with a faction-owned vehicle. To do so you have to follow these steps: Enter the vehicle you wish to put up for sale. Right-click it and select Sell Vehicle. Select 'Place for sale' and read the new menu displayed. This is where you enter the price you wish to sell your vehicle for. We display the vehicle's dealership price to better guide you. You may enable the two options: owner must be online or buyer must have a driver's license. They work the way their title suggests. Once you press Save the vehicle will be displayed for sale. You can verify this by going back to the Sell Vehicle menu or reading your vehicle's ALT description. Other players will now be able to right click your vehicle and select Purchase to buy it. You receive an account notification as well as a chat message (if you're online) whenever someone buys a vehicle that you put for sale. Screenshots
-
AGRP GPS System v1.0 The features described in this guide are subject to change. Explanation The GPS system is really useful if you don't know your way around the map. Additionally, it's a really easy script to utilize once you know the common commands, all of which are outlined within this guide! Should you have any other questions or concerns regarding the GPS after reading this, please ask in-game via F1 or use our Discord's #support channel. Tutorial Obtaining a GPS First and foremost, to use the GPS system you actually need the item. To get this, you have to visit one of the appointed electronic stores. Luckily for you, Montgomery has one right around the corner from the spawn point! The GPS will cost you $200 and will be directly added to your inventory upon purchase. 2. /GPS usage (if you know the address) Now, in order to use the /gps you need to know the address or the interior name. Once you know either of these, you simply enter it into your chat, along with the prefix /gps [Address/InteriorName] 3. /GPS usage (if you don't know the address) The system isn't any more difficult if you don't know the address of the interior. For instance, you'd like to visit a bank. You simply /gps bank and it will automatically print out all the possible options for you to choose from! Once the options are presented to you, you can simply choose your desired location with /gpschoose [# choice] and a blip will be created on your minimap.
-
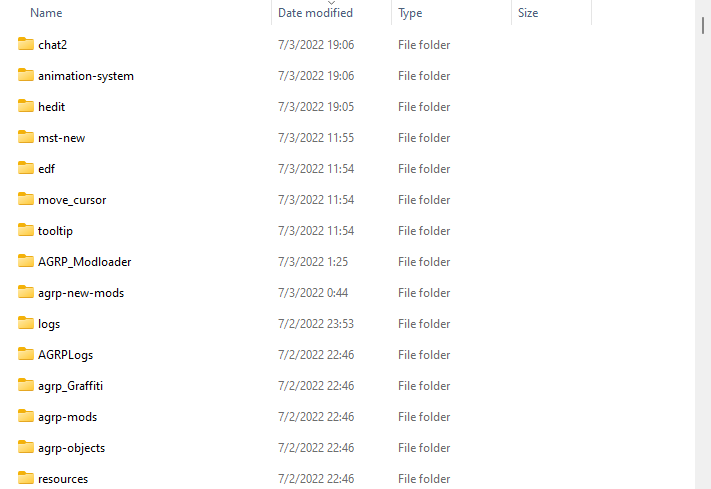
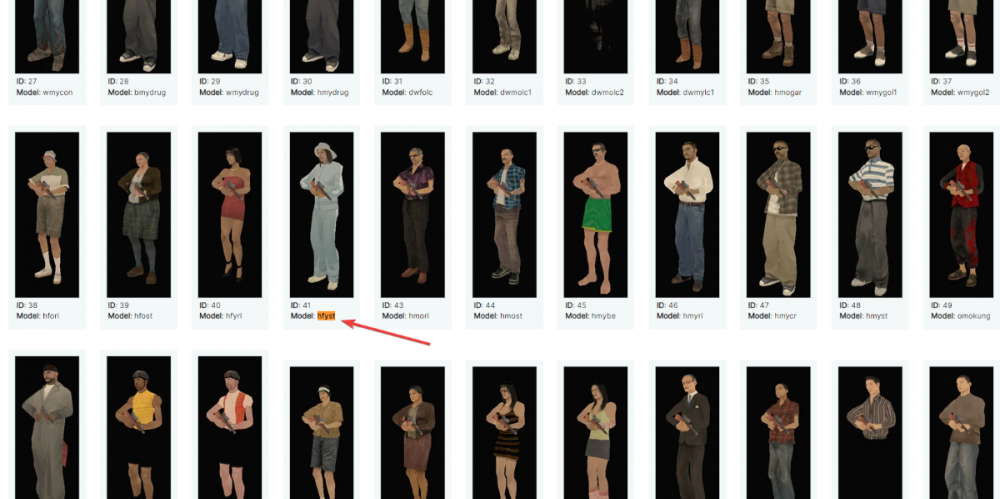
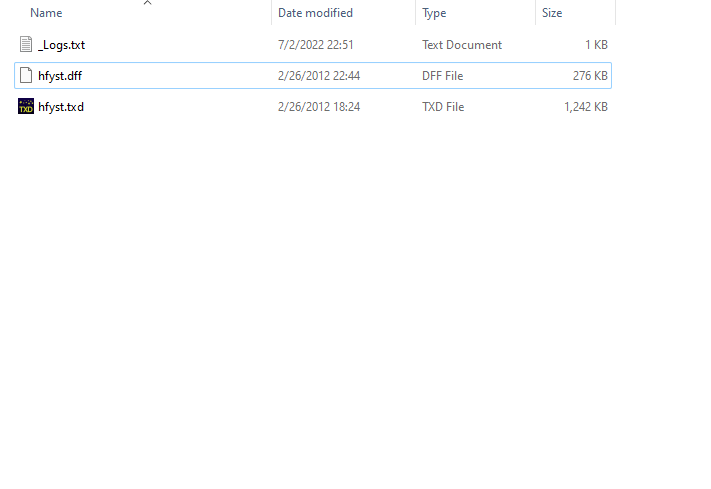
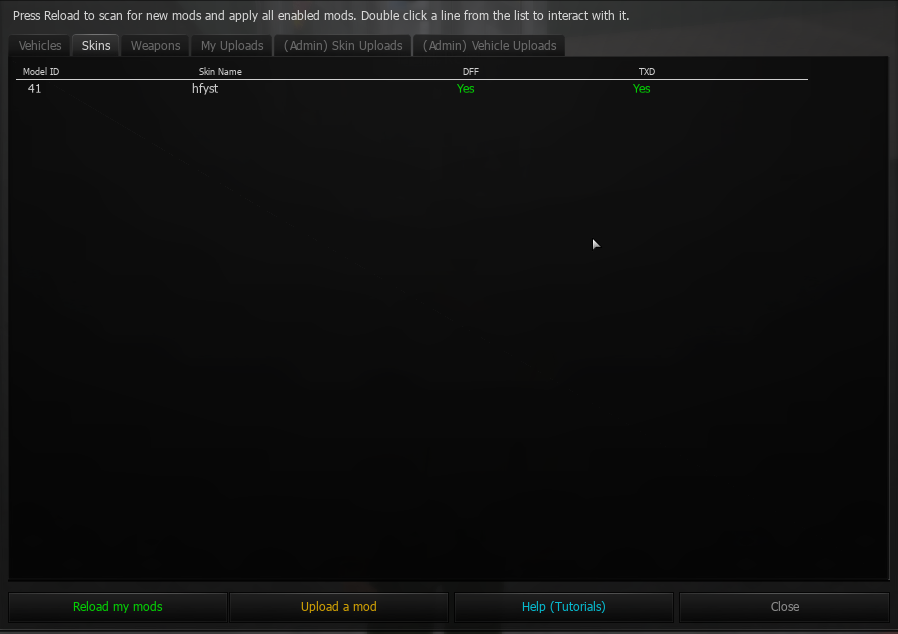
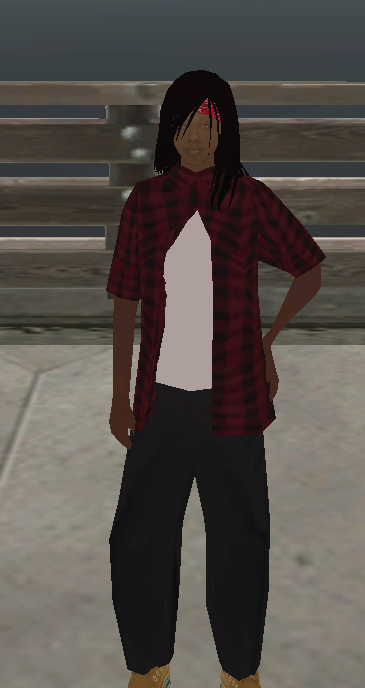
Mod Loader #1 ~Adding Mods Tutorial~ Hi! By now you're probably aware that we have a custom mods loader for in-game resources. If these are mods you just want to use on your client then follow this tutorial. Please Note that this isn't the same as adding mods to the server. These mods can only be seen by YOU! Getting Started To start with, you want to have your mod already downloaded. The following mods can be uploaded; Vehicles Skins Weapons Most mods will come with two files. Please bear in mind, when uploading these mods our system only looks for .DFF and .TXD files. No other file types are accepted. Mods that contain .SFX and .COL or any other file type won't be accepted. The .DFF and .TXD files must be suitable for Grand Theft Auto San Andreas. Note that mods made for Vice City, Grand Theft Auto Three or anything else from the 3D Universe won't be accepted unless they have specifically been ported. Preparing The Mod First we must prepare the mod for the server to upload. We do this by taking our .DFF and .TXD files and upload them to your resources folder which is typically installed in your "C" drive. Here is an example below; C:\ProgramFilesx86\RockstarGames\GTASA\MTA\mods\deathmatch\resources This is where we house all of our client-side files for your machine to store our resources. The Directory will looks something like this; We're looking for the folder named ag_client_modloader. Once we have found that folder, we want to go into the sub-folder named mods. Once we're inside of the mods folder, we can then drag and drop our .TXD and .DFF files in there. You can change the name of the files if you want, as long as you don't change the suffix from .TXD & .DFF respectively. Once you have done that, it will look something like this; **IMPORTANT** It's important to note which skin the mod is for. For example, my files were for the hfyst model. We can easily trace what model this is by using The Official Multi Theft Auto Skin Page As you can see below, I searched for hfyst and found that the Skin ID was 41 This will be important for when we want to set our skin as ID 41 in-game. Note: If your mod doesn't have a recognizable GTA:SA prefix name, don't panic. Our in-game Mod Loader will show the Skin ID under the first column called "Model ID" which can be used to identify which skin you need to purchase from the Clothing Store. Same will apply for vehicles if you're uploading a vehicle mod. Getting The Mod In-Game! Next, we open the Mod Loader in-game by either typing /mymods in chat. We will be presented by this screen; We want to press on the button at the bottom Reload my Mods. Once it has been reloaded, we will see our new mod appearing in our list! All we have to do now is simply go to the Clothing Store and purchase the correct "Skin ID/Model ID" and wear the clothes to see the magic happen in front of our eyes! If we want to temporarily disable a mod, we can double-click on one in the list. This is useful if we have multiple mods that use the same skin and we want to change our appearance/vehicle based on what you're roleplaying! If you're looking to upload a mod to the server (for everyone to see) then please visit our New Add-on Mods Guide Kind~Regards, Upper Administration


-
Dev Blog #1 ~Web Services~ Hi! I thought we'd give a basic overview of all the web development that has been happening. A lot of this information will be behind the scenes and doesn't really benefit any of you guys but it's more just of a showcase. UCP The UCP has now officially been setup. You may notice some of the resources on the UCP aren't going to be our finished product. Some vehicles, skins and even objects need to be reworked. This is fine though, due to the smart coding and how it handles these processes; the resources we have on our UCP are dynamic. This means when we add, edit or remove any of the resources it gets pulled from our MTA server directly, always keeping it up to date. LSCSD Los Santos County Sheriff's Department forum has been setup on a basic level. User permissions, groups and of course some redirects have been made. We have our forms, guidelines and reports ready to go. They just need to be formatted and inserted into the forum. The logos and headers also need to be added but for now it is functionally working. Ardipedia The wiki for our little humble abode is now fully functional and is up to date with the latest rules and guidelines. This will allow for us to tailor our community more accurately allowing for the most optimal playthrough for the season. I hope this helps everyone who may be unsure with some of the specific rules we may have! Nerdy Stats Our stats page is a funky little landing page for those who are interested in some of the resources our server uses. If you want to build your own MTA environment (or any gaming environment which requires similar specs) you can look at our beautifully designed landing page. This page was open-source and was tailored by myself to make it more relevant to the information we wanted to display. Community Forums Naturally, as you're reading this, you know our community forums have been setup. Everything is ready to go... groups, usergroups, ranks and restrictions have been setup in every category and every sub-category based on the user's level permissions; whether they be a Forum Admin, Vehicle Team Member or a Team Leader. This allows for us to delegate workloads specifically for that team, meaning they won't get overwhelmed with all of the categories that aren't relevant to them. Finder The Social Network website which was designed by me originally for San Andreas Roleplay has made its return. Of course, we're going to try and migrate our database from SARP to ensure all stuff stays. As you know, our server is set in present day, so characters from SARP would technically still exist. So due to that, we're willing to keep all aspects of players' characters to allow them to continue their development throughout the Red County Area. Mantis A simple but yet effective tool to allow me to monitor ArdicGaming's process for both the web and the game server. This will also allow users to report bugs through this service. Mantis is a long-term go-to in the community of game development especially in the area of MTA. It's simple and effective which truly allows to get the job done in a timely manner. This Bug Tracker should help keep us organized to allow for more linear style movement on correcting issues within the gamemode. I hope this quirky little update helps for those who wanted to find out exactly what it is we do and what exactly we're aiming to achieve. On a side note, this game mode is currently being setup and developed by myself and I'm being assisted by @Antonia to help make this happen. See you all in the First Season! Kind~Regards, Portside

